I Tried Breaking Fortigate Firmware Encryption as a Beginner, and won 🔓
E-mail me! 📧 // My X AccountMar. 9, 2025
I’ll explain how I broke Fortigate’s firmware encryption to access the router’s binaries, which handle network functions, for reverse engineering.
Table of Contents 📜
Breaking Fortigate 💥
Introduction 📝
I find reverse engineering super cool, I read a thousand ctf/bug bounty blogposts, I did one easy ctf, I think I am ready to find a bug in a security sensitive device!
...cue in 2 months later...
Fortinet makes Internet facing devices, Internet facing devices are interesting for reverse engineers because if a hacker finds a 0day for that device, they’ll have a foothold in your network in a manner no one can prevent.
How am I doing this? 🧑💻
The way I imagine this will go is I will get my hands on the firmware, and then I will be able to extract the binaries that are listening on the internet for traffic, in the hopes of analyzing it and finding a cool vulnerability. To recap: we get the firmware -> we extract the binaries -> we analyze the binaries -> we find a 0day
Getting the firmware image 👾
You can find the images on the vendor’s website or scattered accross the internet, I am currently analyzing fortigate 7.4.6 KVM
Now you should have a file called fortios.qcow2, you’ll probably notice that this image as-is is not useful, what is a qcow2 file anyway?
From wikipedia: “qcow is a file format for disk image files used by QEMU, a hosted virtual machine monitor.”
Okay, so after following this github gist, we get
~/P/g/g/fgt_7.4.6 $ ls -l
total 654840
-rwxr-xr-x. 1 lnn lnn        531 Dec 27 03:04 aes.py*
drwxr-xr-x. 1 lnn lnn          0 Dec 25 06:28 bin/
drwxr-xr-x. 1 lnn lnn         24 Dec 25 06:28 boot/
-r--r--r--. 1 lnn lnn          1 Dec 25 06:28 boot.msg
drwxr-xr-x. 1 lnn lnn          0 Dec 25 06:28 cmdb/
drwxr-xr-x. 1 lnn lnn       3786 Dec 25 06:28 config/
-r--r--r--. 1 lnn lnn   17569927 Dec 25 06:28 datafs.tar.gz
-r--r--r--. 1 lnn lnn   17569927 Dec 25 06:28 datafs.tar.gz.bak
-r--r--r--. 1 lnn lnn        256 Dec 25 06:28 datafs.tar.gz.chk
-r--r--r--. 1 lnn lnn        256 Dec 25 06:28 datafs.tar.gz.chk.bak
-rw-r--r--. 1 lnn lnn          0 Dec 25 06:28 dhcpddb.bak
-rw-r--r--. 1 lnn lnn          0 Dec 25 06:28 dhcp_ipmac.dat.bak
drwxr-xr-x. 1 lnn lnn       2112 Dec 25 06:28 etc/
-rw-r--r--. 1 lnn lnn        165 Dec 25 06:28 extlinux.conf
-rw-r--r--. 1 lnn lnn          0 Dec 25 06:58 fgt
-rw-r--r--. 1 lnn lnn       7551 Dec 25 07:02 FGT.xml
-r--r--r--. 1 lnn lnn         53 Dec 25 06:28 filechecksum
-r--r--r--. 1 lnn lnn    7417952 Dec 25 06:28 flatkc
-r--r--r--. 1 lnn lnn        256 Dec 25 06:28 flatkc.chk
-rw-r--r--. 1 lnn lnn   23012475 Dec 22 02:50 flatkc.elf
-r--r--r--. 1 lnn lnn       3278 Dec 25 06:28 flatkc.sig
-rw-r--r--. 1 lnn lnn  310050816 Mar  5 05:17 fortios.qcow2
-rw-------. 1 lnn lnn 2148073472 Dec 25 07:12 fortitest
-r--r--r--. 1 lnn lnn      11248 Dec 25 06:28 hash_bin.sha256
-rw-r--r--. 1 lnn lnn         32 Feb 10 12:50 key.bin
-rw-r--r--. 1 lnn lnn         64 Feb 10 13:02 key_schedule.bin
-rw-r--r--. 1 lnn lnn        129 Feb 10 13:09 key_schedule.txt
-r--r--r--. 1 lnn lnn     122656 Dec 25 06:28 ldlinux.c32
-r--r--r--. 1 lnn lnn      69632 Dec 25 06:28 ldlinux.sys
drwxr-xr-x. 1 lnn lnn         76 Dec 25 06:28 lib/
drwx------. 1 lnn lnn          0 Dec 25 06:28 log/
drwx------. 1 lnn lnn          0 Dec 25 06:28 lost+found/
-rw-r--r--. 1 lnn lnn      12531 Dec 24 01:55 md32_common.h
-rw-r--r--. 1 lnn lnn        513 Dec 23 21:16 rootfscheck
-rw-r--r--. 1 lnn lnn   73528096 Feb 10 12:52 rootfs.dec
-r--r--r--. 1 lnn lnn   73528099 Dec 25 06:28 rootfs.gz
-r--r--r--. 1 lnn lnn        256 Dec 25 06:28 rootfs.gz.chk
-rwxrwxrwx. 1 lnn lnn   73528099 Dec 27 01:42 rootfs_test.gz*
-rwxr-xr-x. 1 lnn lnn      68697 Feb 10 13:05 serpent.py*
-rw-r--r--. 1 lnn lnn      14505 Dec 24 01:59 sha.c
-rw-r--r--. 1 lnn lnn       3899 Dec 24 01:15 sha.h
-rw-r--r--. 1 lnn lnn          0 Dec 25 06:52 start.sh
-rw-r--r--. 1 lnn lnn        269 Dec 24 01:28 test.c
-rw-r--r--. 1 lnn lnn   73528099 Dec 27 02:21 test_dec.gz
drwxr-xr-x. 1 lnn lnn         56 Dec 27 03:45 testinggg/
-rw-r--r--. 1 lnn lnn        629 Feb 10 13:08 test.py
-rw-r--r--. 1 lnn lnn       4759 Dec 25 05:11 test.txt
d-wxr----t. 1 lnn lnn          8 Dec 25 06:28 web-ui/
Yours probably won’t look the same, because i added a bunch of files
Cool, so after scouring every directory I notice that there’s no trace of binaries here, is this the wrong image? Did I do something wrong?
Does this even work? I boot up the image and check, and it does, so what’s up with that? How does this start? What’s the entryway for a Linux system to start? Maybe the grub config will tell me something
~/P/g/g/fgt_7.4.6 $ cat boot/grub/grub.cfg
search --file --set root /flatkc
linux /flatkc root=/dev/ram0 console=ttyS0 maxcpus=1
initrd /rootfs.gz
boot
flatkc is the linux kernel image that gets loaded, rootfs.gz is the ramdisk, the virtual machine has an empty hdd slot so i assume this is where all of the binaries reside, let’s gunzip it!
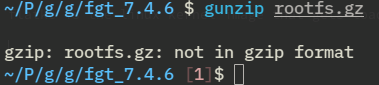
Okay, not a gzip file, what is it then?
```
00000000: 9ca4 26aa cbd5 6c30 5b57 6108 0a2d 5b67  ..&...l0[Wa..-[g
00000010: 3b0f d50a dc9d b0ef a0c6 3265 301b cb21  ;.........2e0..!
00000020: 733c ddf4 3242 68b3 234e bfaa f231 b780  s<..2Bh.#N...1..
00000030: d084 5f2c 35a1 1220 abf8 bb8a 6ab3 ff13  .._,5.. ....j...
00000040: 57a9 b414 ff11 ca2a 1e14 0a53 d87a 073d  W......*...S.z.=
00000050: abf2 2c8a e782 3b85 60bd 2e88 88a9 c140  ..,...;.`......@
00000060: fca5 7b49 e3ee a971 1e50 0a02 b3e7 1fd8  ..{I...q.P......
00000070: 2000 bae1 f2d0 eacb 6bdf 2bb2 c0ec 412a   .......k.+...A*
00000080: 2412 0bca 1072 8ab2 7017 50b8 7591 702b  $....r..p.P.u.p+
00000090: bf0c a3b5 df4e 5527 7c6d 8522 7a10 6153  .....NU'|m."z.aS
```
it doesn’t look like anything, this must mean that rootfs.gz is an encrypted file, flatkc must have some encryption functions that grab this rootfs.gz file and then decrypts it, we just need to slap flatkc in ghidra and look for it.
Reverse engineering the kernel image 🔧
I realize that to figure out how to decrypt the rootfs.gz file, I must first learn how the file is encrypted, so I try to load up the kernel image file for the router (here on after i’ll simply call it ‘flatkc’, which is the name of the kernel image file) in Ghidra, but it doesn’t work, Ghidra cannot load this type of file

the file Unix command says that flatkc is a linux kernel boot executable image, which is not one of the file types listed, fortunately there’s this great tool that converts linux boot images into an ELF, built exactly for this purpose, we can now import it on Ghidra and start looking at it.
I look for functions related with startup and initramfs unpacking, I find a function called populate_rootfs which has the initrd address on it, which i quickly make a note of, and yes, the image came with symbols, but seemingly only the Linux ones and some timer management stuff for some fortigate service we aren’t concerned with.
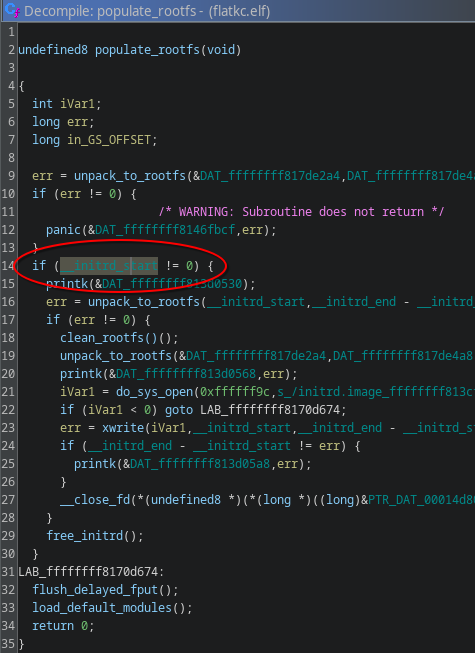
the address of initramfs_start gets mentioned here by a bunch of functions, including an unlabeled one which I labelled myself, proc_crypto_keys (the function does a lot more than this, but you’ll see this later), out of all the functions mentioned, this one seems the most interesting! Let’s look at it
Breakdown of the function 🔍
The decompiled version of the proc_crypto_keys function is very long, and despite the name that i gave it, it does not just process crypto keys (in retrospective, it is a nonsensical name)
I wrote a bunch explaining each and every single line of the decompiled code, but that wasn’t very good reading so i’ll just give you the high level overview of the code except for the interesting part
- It does a bunch of memory hygiene operations like zeroing buffers and initializing variables
- It verifies that the image matches a RSA BER-encoded key
- starts and updates a few SHA buffers
- it encrypts/decrypts something with a function named AES_enc_blk (hm…)
I learned this half from being somewhat experienced with C and reading the decompiled code, and half from asking an LLM what certain confusing code snippets did.
On the beginning on the function there’s a hardcoded ‘master’ key which its multiple derivations get hashed by a SHA function
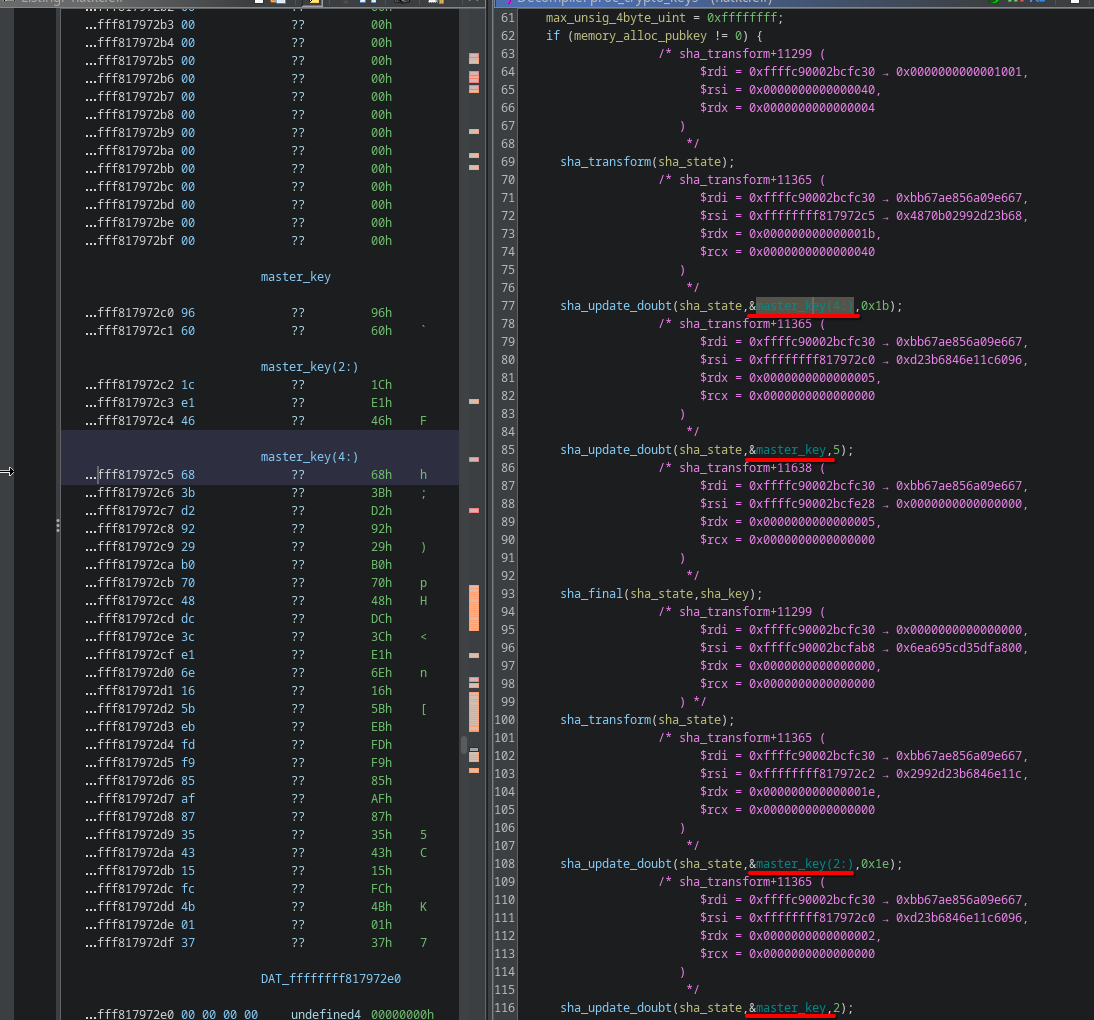 This ‘masterkey’ gets SHA’d and used for decrypting a RSA key used for both image verification and AES key and AES-CTR counter information storage.
Plus I found another binary blob that gets parsed by a “rsa_parse_pub_key” function, I labeled it ’likely rsa key’ for this reason
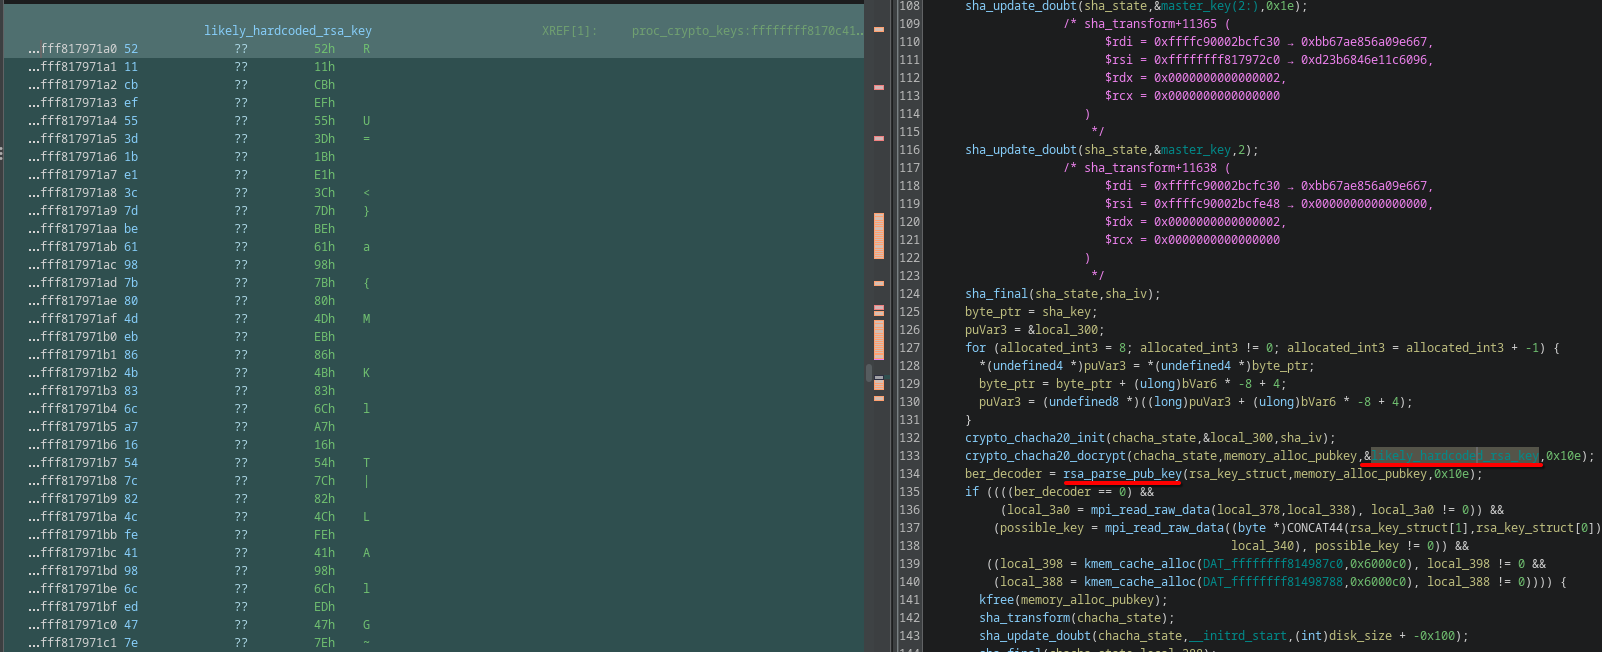
Then chacha20_docrypt decrypts the encrypted memory using the SHA values mentioned previously
Getting the RSA key 🔑
“likely_rsa_key” is an RSA key, I assume this since a RSA-related function calls this chunk of memory as input
      crypto_chacha20_init(chacha_state, sha_key, sha_iv);
      crypto_chacha20_docrypt(chacha_state,memory_alloc_pubkey,&hardcoded_rsa_key,0x10e);
      ber_decoder = rsa_parse_pub_key(rsa_key_struct,memory_alloc_pubkey,0x10e);
before the RSA key gets parsed it gets decrypted with chacha20 using the SHA’d ‘masterkey’ mentioned before as its key and iv, we have all we need to get the RSA key ourselves now
hardcodedkey = bytes.fromhex(<long string of bytes>)

sha = sha256()
sha.update(hardcodedkey[5:])
test = sha.digest()
sha.update(hardcodedkey[:5])
key = sha.digest()
sha = sha256()
sha.update(hardcodedkey[2:])
sha.update(hardcodedkey[:2])
iv = sha.digest()[:16]
print(f"key and iv sha: {binascii.hexlify(bytes(key)).upper(), binascii.hexlify(bytes(iv)).upper()}")
I couldn’t figure it out how the chacha part worked, as i was unable to extract the key using normal libaries, thankfully I find this blog talking about a previous version, it explains that they use a custom chacha function and they also provide us their code
rsa_hardcoded = bytes.fromhex(<long string of bytes>)

chacha = ChaCha20.new(key=key, nonce=iv[4:])
counter = int.from_bytes(iv[:4], "little")
chacha.seek(counter * 64)
rsapubkey = chacha.decrypt(rsa_hardcoded)
print(f"RSAPUBKEY: {binascii.hexlify(bytes(rsapubkey)).upper()}")
we then grab the signature (which is the last 256 bytes of rootfs.gz)
xxd -u -p -s -256 rootfs.gz
The Interesting Part 🤔
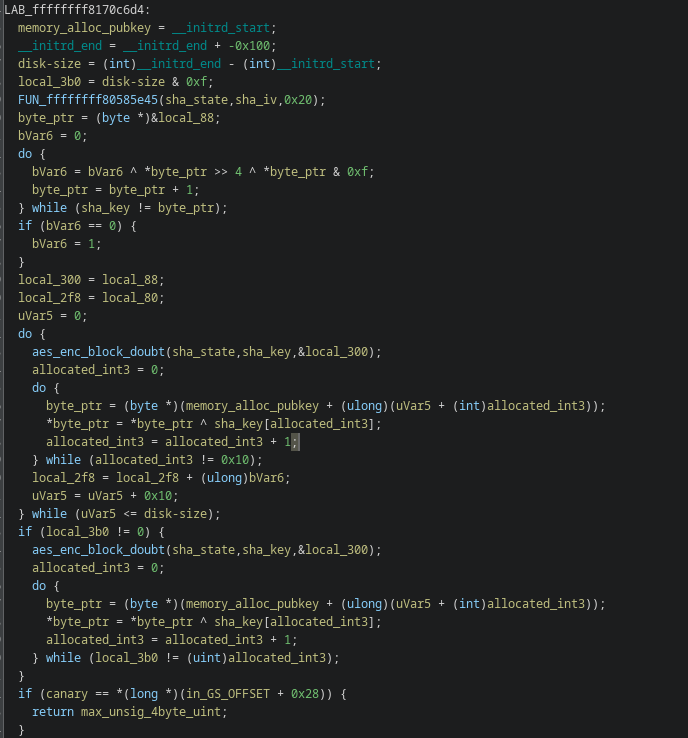
This is the actual decryption routine!
To break it down what this does
memory_alloc__pubkey, which got free’d and dereferenced earlier in the code so the name doesn’t make sense anymore, is set to initrd_start, minus 256 bytes (presumably the signature is appended to the end and it is 256 bytes)
a function (likely something to do with aes) is called with sha_state and sha_iv A loop processes a block of local data (from local_88 up to the location of sha_key) by splitting each byte into its high and low nibbles (4-bit pieces) and XORing them together. This produces a nonzero checksum (bVar6), ensuring that if the computed value would be zero, it’s forced to 1. This value is later used as an increment.
then it loops every 16 bytes and it calls aes_enc_blk and XORs it with memory_alloc_pubkey (if there are fewer than 16 it is processed similarly)
I get the counter values from a memory dump from GDB while running the image, I throw toghether the rest by asking an LLM to rewrite the decompiled code in python and fixing it step by step.
Writing the rootfs.gz decryption code 🔏
I input the decompiled code of the decryption code into an LLM and ask it to write it in python, then i cleaned it up a little, and got this:
class ctr_ctype(ctypes.Union):
    _pack_ = 1
    _fields_ = [("counter", ctypes.c_uint8 * 16)]

checksum = ctr_ctype()
values = [187,
          46,
          188,
          167,
          148,
          31,
          153,
          254,
          246,
          48,
          45,
          255,
          100,
          153,
          115,
          230,
          ]
for i in range(ctypes.sizeof(checksum)):
    checksum.counter[i] = values[i]

count = 0
for byte in range(ctypes.sizeof(checksum)):
    count = ( count ^ (checksum.counter[byte] & 0xF) ^ (checksum.counter[byte] >> 4))
    print(count)

cipher = AES.new(bytes(sig_struct.aes_key), AES.MODE_ECB)
blk_off = 0
rootfs_dec = bytes()
file_in = open("rootfs.gz", "rb")
rootfs_enc = data[:-256]
file_out = open("rootfs.out", "wb")
rootfs_enc = data[:-256]

while blk_off < len(rootfs_enc):
    keystream = cipher.encrypt(checksum.counter)
    fd_out.write(
        bytes(
            [
                b ^ k
                for b, k in zip(
                        rootfs_enc[blk_off : blk_off + AES.block_size], keystream
                )
            ]
        )
    )
    sig_struct.u.ctr.counter += max(ctr_increment, 1)
    blk_off += AES.block_size
    pbar.update(AES.block_size)

    if len(rootfs_enc) % AES.block_size > 0:
        keystream = cipher.encrypt(sig_struct.u.counter)
        fd_out.write(
            bytes([b ^ k for b, k in zip(rootfs_enc[blk_off:], keystream)])
        )
it uses AES in CTR mode to decrypt the file, but it has a custom counter so i couldn’t just use that. And that’s it!
~/P/g/g/fgt_7.4.6 $ file rootfs.dec
rootfs.dec: gzip compressed data, last modified: Tue Dec 10 18:42:58 2024, from Unix, original size modulo 2^32 119282688